Today we are building an image gallery with Laravel and React. Building an Image Gallery with Laravel and React.
[download_after_email id=”833″]

Now Start from Frontend part So we will making our ReactJS Project . To Install React project run this command in your cmd or terminal npx create-react-app image_galllary .
Reactjs or Angular and Any other Server side Languages such as PHP or .NET uses API for Communication with each other.
I am using Axios for data sending to Laravel so you can use fetch or Axios. To Install Axios write command npm install axios or yarn add axios. Read more about axios() and fetch()
Axios: Axios is a Javascript library used to make HTTP requests from node.js or XMLHttpRequests from the browser and it supports the Promise API that is native to JS ES6.
Fetch: The Fetch API provides a fetch() method defined on the window object. It also provides a JavaScript interface for accessing and manipulating parts of the HTTP pipeline (requests and responses).
Watch Video Tutorial
Also install bootstrap for a good designing. To Install Bootstrap npm install bootstrap or yarn add bootstrap .
I will use Functional Component not Class component btw You can use Class component but hooks make our life easy in Function Component .
Make ImageGallary.js file inside src folder of react project (src/ImageGallary). ImageGallary is a functional component.
ImageGallary.js
import "bootstrap/dist/css/bootstrap.min.css";
import React, { useState, useEffect } from "react";
import axios from "axios";
function ImageGallary() {
const [selectedFile, setSelectedFile] = useState();
const [loadimage, setLoadImage] = useState([]);
const [name, setName] = useState("");
const [desc, setDesc] = useState("");
useEffect(() => {
loadList();
}, []);
const loadList = async () => {
const result = await axios.get("http://localhost:8000/api/list");
setLoadImage(result.data.reverse());
};
const handleSubmission = async (e) => {
const formData = new FormData();
formData.append("file", selectedFile);
formData.append("name", name);
formData.append("desc", desc);
await fetch("http://localhost:8000/api/upload", {
method: "POST",
body: formData,
})
.then((result)=>{
loadList();
})
.catch(()=>{
alert('Error in the Code');
});
};
const deleteImage = (productId) =>
{
axios.get('http://localhost:8000/api/delete/'+productId)
.then((result)=>{
loadList();
})
.catch(()=>{
alert('Error in the Code');
});
};
return (
<div className="container">
<h4 class="text-center text-success ml-4 mb-4 mt-4">Image Gallary in ReactJS</h4>
<div className="row">
<div className="col-sm-3 p-2 bg-gray">
<div className="box mr-4" style={{border:"1px solid #b7b7b7",backgroundColor:"#rgb(253 253 253);"}}>
<h5 class="text-center ml-4 mb-3 mt-3">Add Image</h5>
<table className="">
<tr>
<td>
<div class="form-group ml-3">
<input type="text" name="name" className="mb-4"onChange={(e) => setName(e.target.value)} placeholder="Country Name"/>
</div>
</td>
</tr>
<tr>
<td>
<div class="form-group">
<textarea type="text" name="desc" className="mb-4" rows="3" cols="23" onChange={(e) => setDesc(e.target.value)} placeholder="Write Description" />
</div>
</td>
</tr>
<tr>
<td>
<div class="form-group">
<input type="file" name="file" className="mb-4" onChange={(e) => setSelectedFile(e.target.files[0])} />
</div>
</td>
</tr>
<tr>
<td>
<div class="form-group">
<button type="submit" onClick={handleSubmission}class="btn btn-success mb-3" name="submit">
Add Gallary
</button>
</div>
</td>
</tr>
</table>
</div>
</div>
<div className="col-sm-9">
<div className="row">
{loadimage.map((name) => (
<div className="col-sm-3">
<div class="card mb-3" style={{width:"12rem"}}>
<h5><a href="#" onClick={() => deleteImage(name.id)} style={{textDecoration:"none",marginLeft:"162px"}}>
<span aria-hidden="true" className="text-danger">×</span>
</a></h5>
<img class="card-img-top hover-shadow" src={"http://localhost:8000/" + name.img_path} alt="Card image cap" style={{height:"110px"}}/>
<div class="card-body">
<h6>{name.name}</h6>
<span class="card-text">{name.description}</span>
</div>
</div>
</div>
))}
</div>
</div>
</div>
</div>
);
}
export default ImageGallary;
Now I will call this ImageGallary file inside App.js. You can set different port using this line of code in package.json file “start”: “SET PORT=3001 &&react-scripts start”,
App.js
import './App.css';
import ImageGallary from './ImageGallary';

function App() {
  return (
    <div className="App">
      <ImageGallary />
    </div>
  );
}

export default App;
Our Reactjs project will run on 3001 Port http://localhost:3001/
Our React work is completed now Backend Code starts here
First Create a database in PhpMyAdmin named react_image_gallary and Table name will be image_gallary.

So First I will manage CORS Error If we don’t manage CORS then You will get errors while sending requests from ReactJS to PHP or .NET . ( I assume that you can install Laravel Project )
This is CORS Error
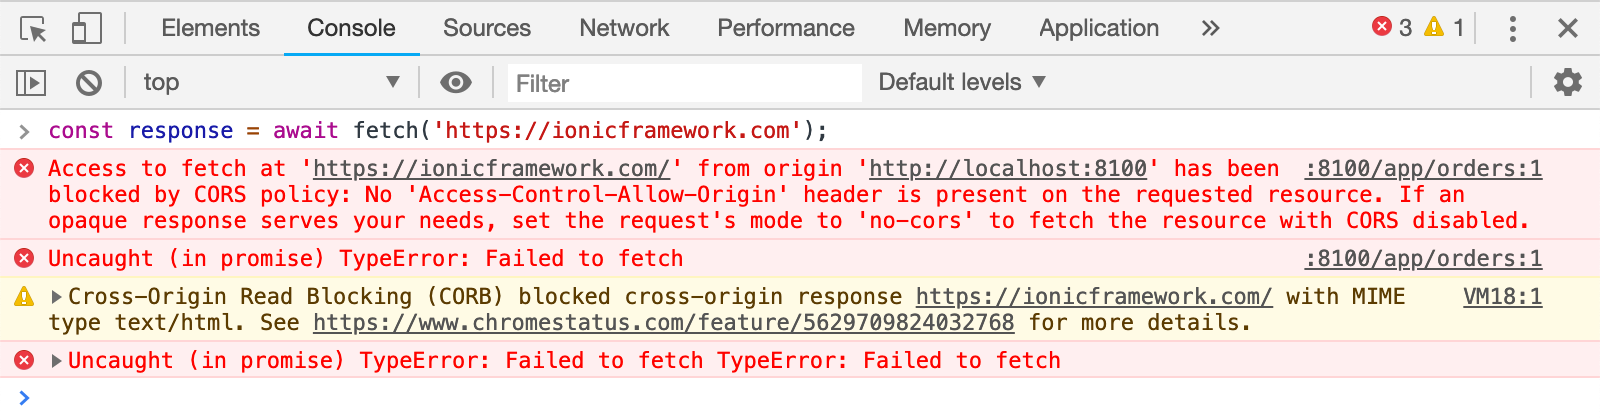
So now I will create one file named Cors.php file inside the Middleware folder (app/http/middlewares/Cors.php). I will write some lines of permission here in the Cors.php file
Cors.php
<?php
namespace App\Http\Middleware;
use Closure;
class Cors
{
    /**
     * Handle an incoming request.
     *
     * @param  \Illuminate\Http\Request  $request
     * @param  \Closure  $next
     * @return mixed
     */
    public function handle($request, Closure $next)
    {
        //ALLOW OPTIONS METHOD
            return $next($request)
              ->header('Access-Control-Allow-Origin',"*")
              ->header('Access-Control-Allow-Methods', 'GET, POST, PUT, DELETE, OPTIONS')
              ->header('Access-Control-Allow-Headers',' Origin, Content-Type, Accept, Authorization, X-Request-With');

    }
}
Now call the Cors.php file inside Kernel.php using this line of code \App\Http\Middleware\CORS::class. (app/http/Kernel.php) . Now Cors.php file is usable.
Now Create a routing File for the Laravel Project inside the routes folder api.php. I will not use web.php because I am working on API so that I will write every route in the api.php file
<?php

use Illuminate\Http\Request;
use Illuminate\Support\Facades\Route;
use App\Http\Controllers\ImageGallary;
/*
|--------------------------------------------------------------------------
| API Routes
|--------------------------------------------------------------------------
|
| Here is where you can register API routes for your application. These
| routes are loaded by the RouteServiceProvider within a group which
| is assigned the "api" middleware group. Enjoy building your API!
|
*/
Route::middleware('auth:api')->get('/user', function (Request $request) {
    return $request->user();
});
Route::post('upload',[ImageGallary::class,'saveImage']);
Route::get('list',[ImageGallary::class,'dataList']);
Route::get('delete/{id}',[ImageGallary::class,'deleteImg']);
Now make a Controller ImageGallary.php . I am using Query builder of Laravel so I don’t have to make model files. You can use Eloquent of Laravel.
ImageGallary.php
<?php

namespace App\Http\Controllers;

use Illuminate\Http\Request;
use Illuminate\Support\Facades\DB;
use Redirect,Response,File;

use Illuminate\Support\Facades\Storage;

class ImageGallary extends Controller
{

    function saveImage(Request $request)
    {
      $fielnames = $request->input('name');
      $desc = $request->input('desc');
      $filepath = $request->file('file')->store('products');

      DB::table('image_gallary')->insert([
            'name' =>  $fielnames ,
            'img_path' => $filepath,
            'description'=> $desc
          ]);
    }
    function dataList()
    {
      $res =  DB::table('image_gallary')->get();
      return Response::json($res);
    }
    function deleteImg($id)
    {
      $res = DB::table('image_gallary')->where('id', $id)->delete();
      return Response::json($res);
    }
}
Run this command php artisan storage:link It will store Your files in storage/app/products, Every time products folder will automatically generate.
Set this line of code inside filesystems.php file. (config/filesystems.php)
‘links’ => [ public_path(‘products’) => storage_path(‘app/products’), ],
Using above link I will store my image on that link (storage/app/products).
Now I will run this project from reactjs http://localhost:3001/
Subscribe to My Programming YouTube Channel Before Downloading the code :
Download Source Code : ReactJS Laravel Image Gallary
Learn more tutorials on ReactJS
How to create barcodes in ReactJS